Raspberry Pi
You can use any Raspberry Pi model with a 40-pin GPIO header with MainsailOS. This page provides a hardware reference for using GPIOs and communication interfaces with Klipper.
Supported Models
| Model | Recommended | Note |
|---|---|---|
| Model 1A/B, Zero 1 | ❌ | Very limited RAM and CPU, not recommended |
| Model 2B | ⚠️ | Limited performance |
| Zero 2 W | ✅ | |
| Model 3A+, 3B, 3B+ | ✅ | |
| Model 4B, CM4 | ✅ | Best choice for 3D printing |
| Model 5, CM5 | ⚠️ | Not recommended with webcams (no HW encoding) |
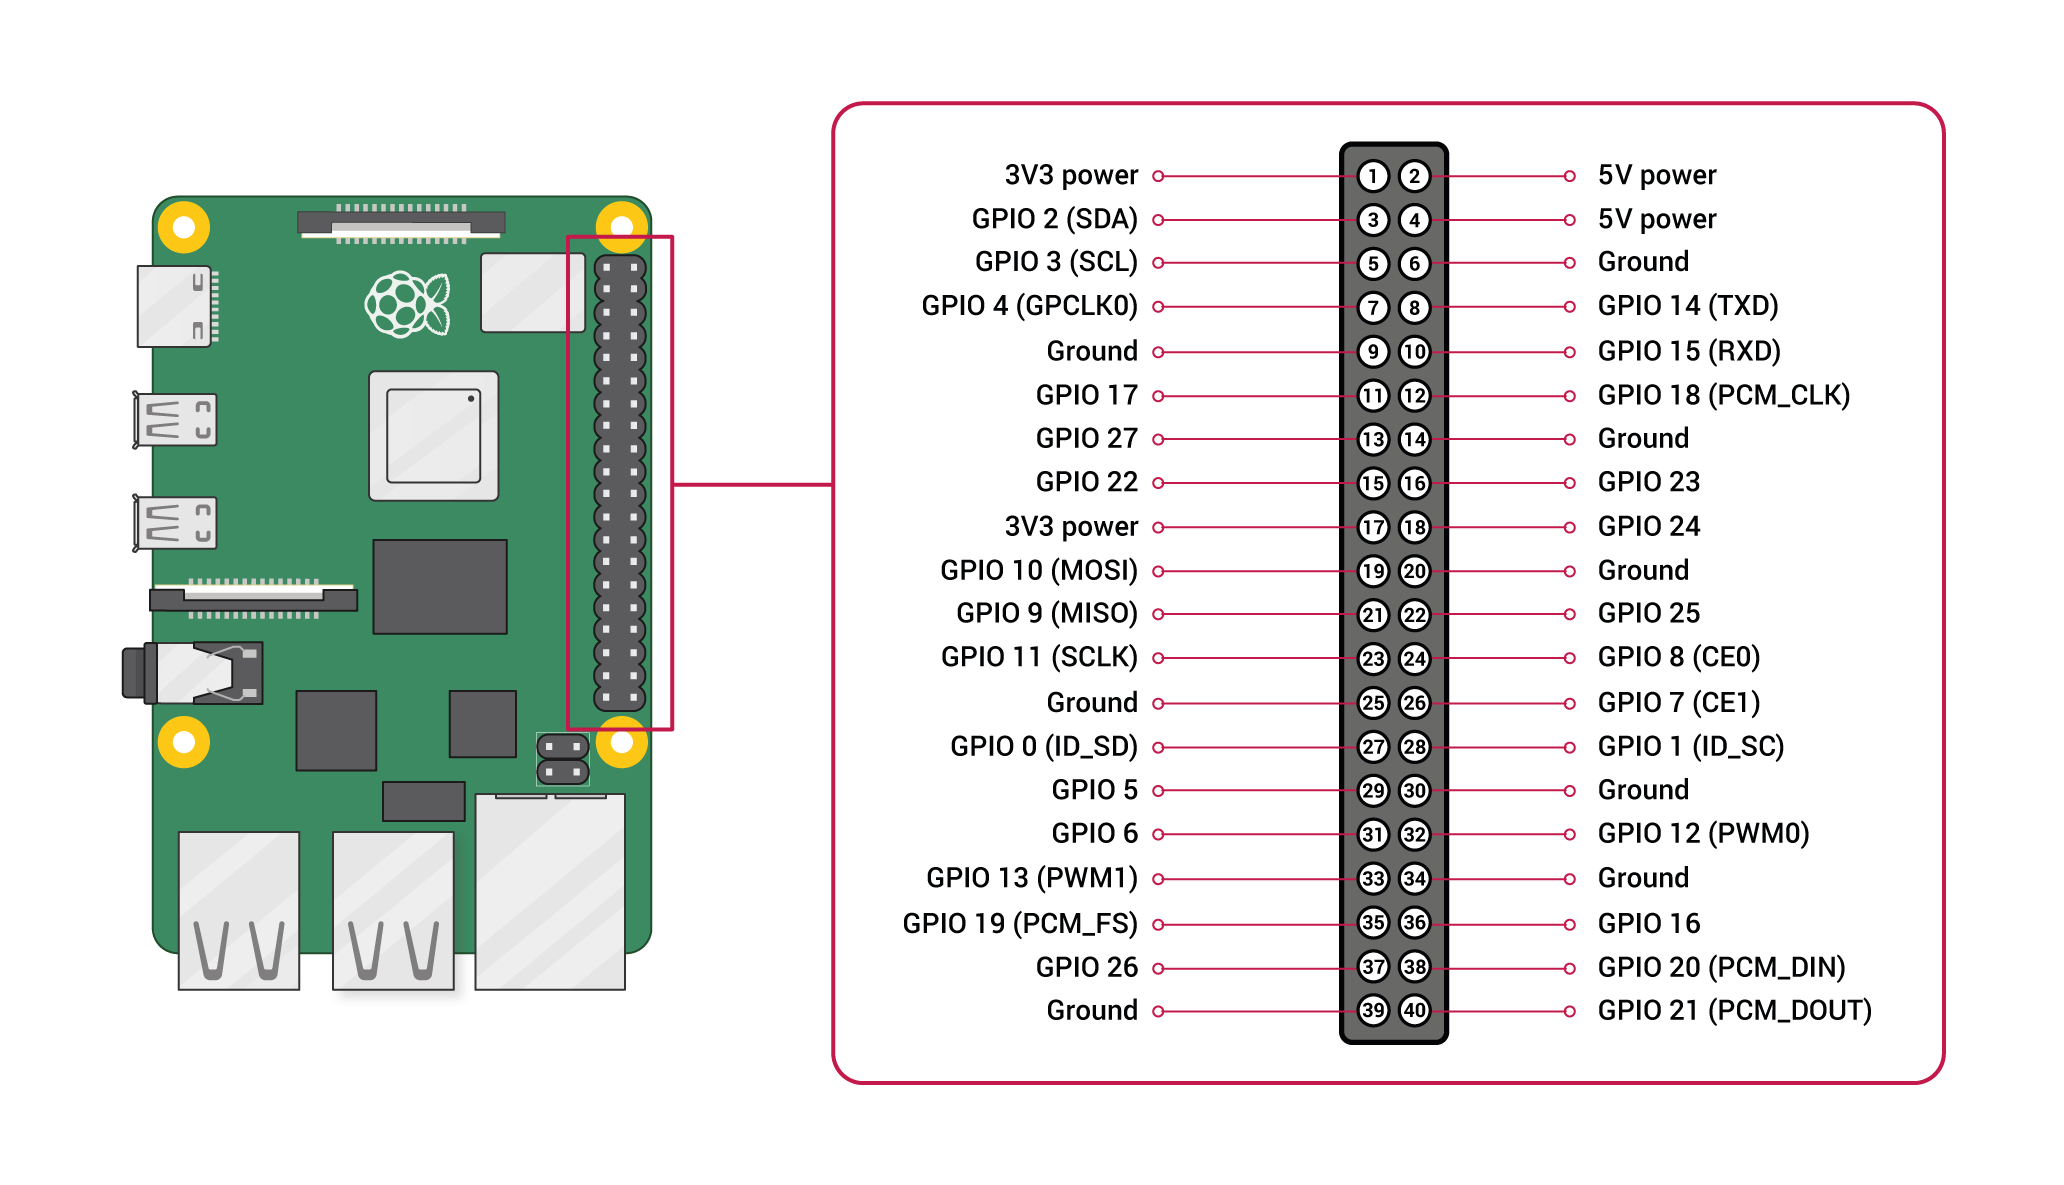
GPIO Pinout
The following pinout diagram applies to all Raspberry Pi models with a 40-pin GPIO header:
GPIO Chip
When using GPIOs with the Linux MCU in Klipper, you need to specify the correct GPIO chip:
| Model | GPIO Chip |
|---|---|
| Raspberry Pi 1–4 | gpiochip0 |
| Raspberry Pi 5 | gpiochip4 |
Example for Raspberry Pi 1–4:
Example for Raspberry Pi 5:
Identifying the Correct Chip
If you are unsure which GPIO chip to use, you can list the available chips and their lines:
UART
MainsailOS pre-configures the Raspberry Pi for UART communication by:
- Enabling the hardware UART (PL011)
- Disabling Bluetooth (which otherwise occupies the PL011 UART)
- Removing the serial console from the UART
This means /dev/serial0 is immediately available for connecting an MCU. No additional configuration is needed.
| Interface | Device Path | TX Pin | RX Pin |
|---|---|---|---|
| UART0 | /dev/serial0 |
GPIO 14 (Pin 8) | GPIO 15 (Pin 10) |
Cross the TX/RX Lines
The TX pin of the Raspberry Pi connects to the RX pin on the MCU, and vice versa.
Bluetooth
Bluetooth is disabled by default on MainsailOS to free the UART. If you need Bluetooth instead of UART, see the Enable Bluetooth on RPi guide.
Raspberry Pi 5
The Raspberry Pi 5 has additional UARTs available. Refer to the Raspberry Pi documentation for details on UART0–UART4.
SPI
SPI is enabled by default in MainsailOS (dtparam=spi=on in config.txt). This is pre-configured for use with
accelerometers for Input Shaper.
| Interface | Device Path | MOSI Pin | MISO Pin | SCLK Pin | CE0 Pin | CE1 Pin |
|---|---|---|---|---|---|---|
| SPI0 | /dev/spidev0 |
GPIO 10 (Pin 19) | GPIO 9 (Pin 21) | GPIO 11 (Pin 23) | GPIO 8 (Pin 24) | GPIO 7 (Pin 26) |
For Klipper configuration, refer to the Klipper SPI documentation.
I2C
I2C is enabled by default in MainsailOS (dtparam=i2c_arm=on in config.txt). This is pre-configured for use
with Klipper's Linux MCU.
| Interface | Device Path | SDA Pin | SCL Pin |
|---|---|---|---|
| I2C1 | /dev/i2c-1 |
GPIO 2 (Pin 3) | GPIO 3 (Pin 5) |
In your Klipper configuration, use i2c_bus: i2c.1:
Higher Baud Rate for MPU Accelerometers
If you use an MPU-based accelerometer over I2C, you may want to increase the baud rate. Replace the I2C line in
/boot/config.txt with:
For more details, refer to the Klipper I2C documentation.
Further Resources
- Raspberry Pi GPIO Pinout — Interactive pinout reference
- Raspberry Pi Documentation — Official documentation
- Klipper RPi Microcontroller — Klipper Linux MCU guide